Showing posts with label crafts. Show all posts

Wednesday, February 3, 2016

DIY iPad cover


I have been on the search for a case for the iPad to clip onto the front seat in our car so Rand can watch movies during a long car ride. I never found anything that fit the iPad and the Outterbox case so I made my own.

Front fabric is 12.5"X 11" but I clipped the top two corners. The back fabric is 12.5" x 12" and for the straps I cut two 4" x 6" pieces of fabric. I added holes on each side to plug in to charge so four 2" x 2" squares. The opening is 9" x 6" and I used a plastic paper sleeve protector to cover the hole. 


Friday, December 18, 2015

DIY Ugly Christmas Sweater and skirt


It is that time of year... pull out your Ugly Christmas Sweater! 
Rob and I never really got into UCS but we got invited to a party this year where we had to wear one. I decided to just make our own since I am cheap like that, lol. I drew up a pattern and cut out felt to attach onto an old sweater of my husband's. He loved it so much that he wore it to work! 

 I saw on Pinterest a cute idea where you attach a ton of bows onto a skirt. I did not have a skirt I was willing to ruin so made my own simple elastic waistband skirt with red felt. I separated the bows  (I bought 3 bags of 45each) into two piles to make sure I had enough for each side of the skirt. I also separated the bigger ones from the smaller to make sure they were evenly spaced on the skirt. I kept the paper intact on the bottom of the bow and just hot glued them down so I can re-use the bows. After I glued them all down, I put the elastic in the skirt and voila! I have the perfect skirt to wear to a Christmas party! I had some extra bows so plan on making a little headband to match.


Thursday, November 19, 2015

DIY Burlap Banner

It is almost time to break out the mistletoe and decorate for Christmas so in preparation I am making burlap banners to hang on the walls. I also make them to sell on my Etsy and Facebook page. If you feel like trying your hand at making your own, here are the instructions.

You will need:
-burlap
-glue
-water
-a bowl
-a paint brush
-a drying rack (optional but will help a lot)
-scissors
-a sheet of paper
-stencil (optional but very useful, especially if you don't have the nicest penmanship)
-paint or a permanent marker
-twine
-glue gun and glue sticks

First, you need to cut the burlap into strips. I already created a template for my pendants so I used my sheet of paper for a guide to cut out the height of my strips. Be sure to cut in between the weave. This is to help prevent it from unraveling. 
You can either cut right in between the weaves or pull up a string of twine and pull it all the way out of the weave to use as a guide to cut. 
Next, mix water and glue into a bowl. Paint the water/glue mixture onto the strips of burlap. This helps prevent the banner from fraying and falling apart and will help this banner last more than one holiday ;)
 After I hang them up, I usually let mine dry overnight. 

After they are dry, I cut out my pendants. Below you can see the templates I cut out. I use these to help cut out my pendants. Be sure to cut between the weave again to prevent it from fraying. You will be cutting across the grain for the detail on the bottom of the pendants, this is why it is important to paint them with the water/glue mixture. Next, I use my stencil and write out my letters. 
The last step is to glue each pendant on twine. 
 All done and ready for the holidays!

Thursday, December 18, 2014

A Robe for Rand

I have been wanting to buy a robe for Rand but refuse to pay $30 for it, especially when I can just make my own. I found some beautiful handsome fabric at Fabric.com. I came up with my own pattern (I did a lot of fittings) and was super excited to give it to Rand for Christmas!


Wednesday, December 17, 2014

DUKTIG Play kitchen ~ IKEA Hack


I love Ikea and I love projects so when I saw this adorable DUKTIG play kitchen, I just had to get it.  
My husband was a HUGE help and painted all of the piece, except I wanted to paint the counter top. I wanted it to look like granite, specifically like the one in our house in Alabama. I played a lot with colors and did tons of coats in different hues of black and gray, along with crinkling up paper to give it a more "granite" look. 


After many coats and letting it dry completely, I bought some Klarlack (clear lacquer) for a top coat. It smelt horrible but gave it a nice shiny finish. 

I bought some drawer knobs at the local euro store,  Tedi (similar to a dollar store) and attached them above one of the drawer to make it look like a working stovetop and oven. 


I am very excited about this Ikea Hack and can not wait to see Rand play with it on Christmas morning!

Monday, July 7, 2014

LÄTT ~ Ikea hack

I have been putting this off long enough... over a year ago I bought this table and chair set from Ikea for under 20euro. I had all these great ideas for it and finally put it all together this weekend.


I started off by painting the top of the table with some black chalkboard paint I bought online. After many, many, many coats and a full day to dry I used Provence Annie Sloan chalk paint and painted the rest of the table. For the chairs, I removed the seat part and spray painted the chairs in gray. After a couple days of airing out, I covered the seat in this cute fox and the houndstooth fabric that was left over from another project.


Saturday, April 19, 2014

diy wagon wheel chandelier

Back when I was pregnant with Rand I bought a few old wagon wheels for a few euros at a nearby flohmrkt. At that time I thought that if I could make a chandelier out of it, that would be the coolest thing ever. Fast forward a year and a half and I was still starring at those wagon wheels saying I needed to jump on this project.

I am a bit of a hoarder of glass jars so I grabbed some and twisted some wire around and hung them from some rope. I also used the rope to wrap and hang the wheel sideways from the gazebo in my backyard. I just pop in some tea lights and bam... adorable chandelier!

DIY Chair Redo

I bought this fabric last year at Ikea and have been on the search for a chair to recover since. I finally found this chair on Bookoo for 20euro but had to let it "air out" for a week and spray it with some vodka to get it smelling better. After it was ready to move inside, I started cutting and pinning my fabric. It didm't take too long to get it pinned together but I admit, I did not do this correctly. I should have ripped off the old fabric and put on new batting and such but... whatever.


Monday, April 7, 2014

DIY Multicolored Mustache Garland

Lately, I have been getting a lot of special orders... especially fun and colorful garlands for smash cake photo sessions! One that I just finished was a multicolored mustache garland. My client sent me a photo of the tie and hat the Birthday boy will be wearing and asked me to make a garland that matched. 


I decided to try something new and wanted to stiffen the felt I used to make the mustaches. Its very simple to do. All you need is mix 1 part glue and 1 part water in a dish. Take your felt and dip it into the mixture. Get the felt nice and wet and carefully squeeze the excess water/glue out. I folded it longways and slide the felt between my fingers. I layer the felt out in the sun on some wax paper but ended up hanging them on my clothesline a couple hours later because it got a little windy out. It took about 5-6 hours to completely dry.  


The next day, I cut out my mustaches and sewed them with black thread. 
Mine ended up being a little over 60" long. 


*You can cut the shapes out and then dip them in the glue mixture but they may shrink a little.


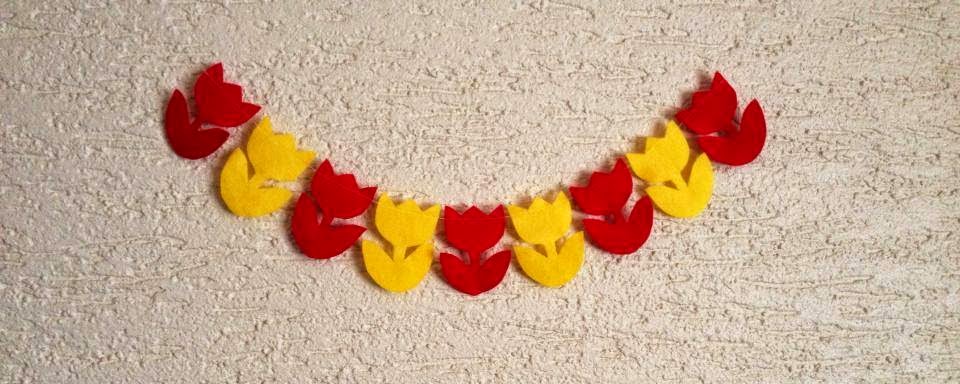
Here are some other fun garlands I have made recently...

 Red & Yellow Tulips

Construction theme

John Deere theme

Thursday, March 13, 2014

DIY Sensory Board

I am all about crafts and helping my child learn and explore. I have tons of different materials laying around my house and thought it would be a fun project to make a sensory boards for Rand. 

Supplies:
foam board
jar lids
scraps of different types of materials
hot glue gun with sticks

I carfeully glued each material to a different lid. Make sure to glue them  securely on the top, sides and under the lip of the lid. After I glued all the materials on the lids, I laid them out on my foam board and glued them on. 

Here are some suggestions on what to use for different materials. Fabric stores are great to look for material for this project.  A remnant can go a long way.  Also look at the craft supplies and hardware stores.

-lace
-tassel trim
-silk or satin material
-dried pasta
-rope (I glued them in a spiral to cover the entire lid)
-glitter (I used some glitter paper from my scarp booking supplies)
-cotton balls
-tin foil
-an old teddy bear for "fur"
-feathers
-sandpaper
-sponges or brillo pads


Tuesday, January 7, 2014

diy Felt Fringe Garland

Since I have had some down time till the next craft bazaar I have been putting together new products to sell, besides my dirndl and lederhosen onesies. I have tons of felt and so I have been busy cutting and sewing little garlands to my hearts content. The one I just finished last night was a patriotic felt fringe garland. It was very easy to make but does take a lot of time (helps it you are watching a good movie).

First, I cut up little strips about 1/2 inch thick and then cut those to be 2 inches long. 

 And repeated like a bajillion times in different colors.
 Next, I used by embroidery thread, made a loop on one end and used my needle to go through the center of the strip twice, like so.
 My needle made a U-turn and went back through BUT NOT the same holes. Pull your thread through the felt strip to make it looked pinched.
 Now repeat...
 ...and repeat...
 ...till you get to the desired length you want your garland to be. Mine is about 64 inches long. Make sure to tie another loop on the other end of your garland so it is easy to hang up.